
Ponds 103 Chapter 7
Helpful Tips Before You Rock
You will have already decided whether you want to rock the whole pond, or just the Rock Shelf, but either way, now’s the time, and there’s no better way to learn than by doing. This text can’t teach much about rock placement, but here are a couple of tips that may prove helpful.
- Use thin, wide stones as the first course on the Rock Shelf, and overhang them 2-3”, just enough to hide the 10” vertical wall of black liner below from view. The successive course or courses above can be set back a little to counterbalance the overhanging stones.
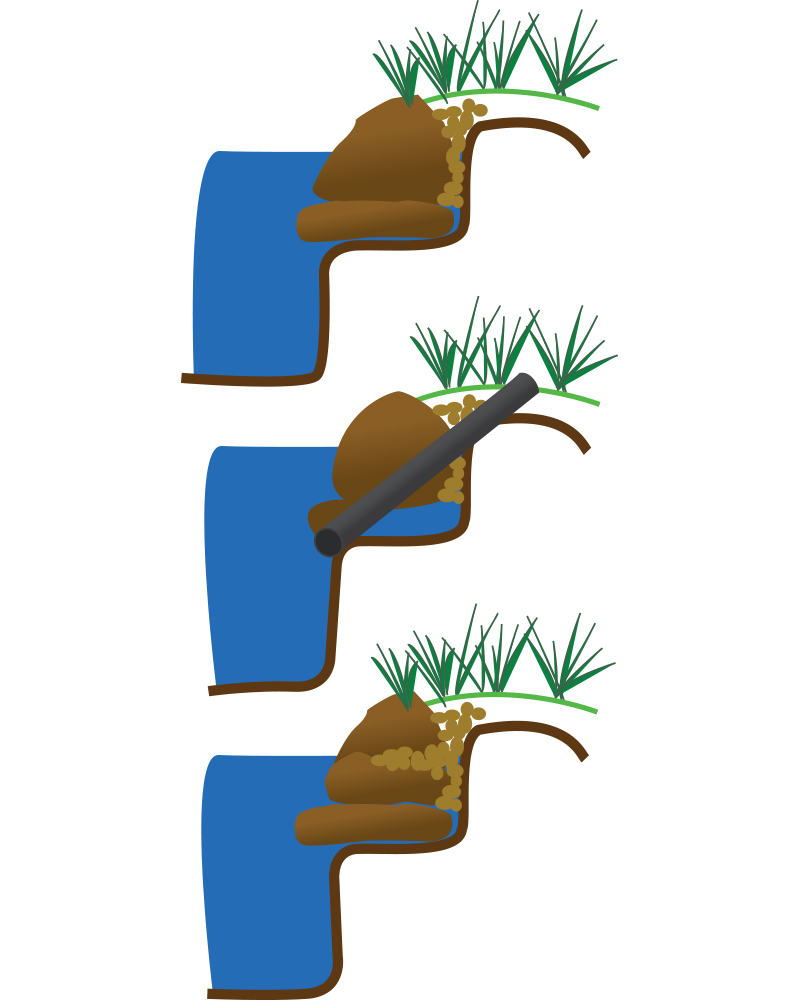
- Take some lengths of 2” or larger scrap tubing and lay them on the Rock Shelf as conduits for future placement of cords or air hoses. Set the conduit so the outside end will end up above the liner outside the pond with the inside end hidden by an overhanging stone. Put one on either side of the waterfall for possible future light placement, and one farthest from the deepest part of the pond, for an air hose to keep ice from sealing the surface of the pond in winter.
- Break up the “string of pearls” effect of one stone after another in a continuous ring around the pond by setting the tops of some of the coping stones just below water level, taking care to keep the liner behind at the right level. Cover the top of the stone and the liner behind it with a marginal plant like Creeping Jenny (Lysimachia) or a piece of sod to bring greenery right to the water’s edge.
- Backfill behind coping stones with gravel to lock them in place and to keep liner from “drooping”. The gravel provides additional substrate for beneficial bacteria and also provides a firm base for soil, sod or mulch up to the coping stones.
You will have already decided whether you want to rock the whole pond, or just the Rock Shelf, but either way, now’s the time, and there’s no better way to learn than by doing. This text can’t teach much about rock placement, but here are a couple of tips that may prove helpful.
- Use thin, wide stones as the first course on the Rock Shelf, and overhang them 2-3”, just enough to hide the 10” vertical wall of black liner below from view. The successive course or courses above can be set back a little to counterbalance the overhanging stones.
- Take some lengths of 2” or larger scrap tubing and lay them on the Rock Shelf as conduits for future placement of cords or air hoses. Set the conduit so the outside end will end up above the liner outside the pond with the inside end hidden by an overhanging stone. Put one on either side of the waterfall for possible future light placement, and one farthest from the deepest part of the pond, for an air hose to keep ice from sealing the surface of the pond in winter.
- Break up the “string of pearls” effect of one stone after another in a continuous ring around the pond by setting the tops of some of the coping stones just below water level, taking care to keep the liner behind at the right level. Cover the top of the stone and the liner behind it with a marginal plant like Creeping Jenny (Lysimachia) or a piece of sod to bring greenery right to the water’s edge.
- Backfill behind coping stones with gravel to lock them in place and to keep liner from “drooping”. The gravel provides additional substrate for beneficial bacteria and also provides a firm base for soil, sod or mulch up to the coping stones.

