
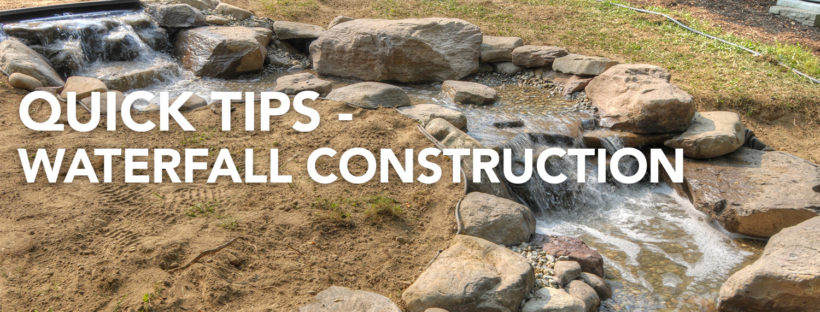
In the world of water features, there are many different tactics that contractors and homeowners use to approach building a water feature. Over the years I have encountered a variety of construction methods water features are built and through my experience have put together a list of tips that I think will help you create a natural looking water feature.
Use different sized rocks to achieve a more natural looking waterfall. But let’s be honest, when building these features moving heavy rocks can be quite the challenge.
 Tip #1.
Try cutting a piece of underlayment (commonly known as geotextile fabric) large enough to hold the rock you are trying place and use it as a sling. The corners will act as handles for you to hold on to. Because the fabric is very strong it can handle the weight of heavier rocks.
Another option to move heavy 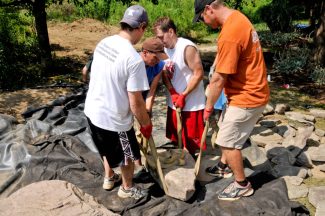 rocks by hand is to use tow straps or tie down straps. This method can be used with heavier rocks and will require more than two people to move the size rock you are working with.
If you are using large boulder and neither of the two options prove useful, you may need the help of larger equipment.
**You do not want to hurt yourself trying to move these rocks, equipment can be rented on a day to day basis at your local rental yard.
While you are placing your rocks keep in mind that you are also creating a place for water to flow. When creating your waterfall or streambed you will notice gaps forming around and behind the rocks that you have placed. Once you turn on your pump water will flow into these gaps instead of flowing down your streambed causing you to lose some of the visual effects of your stream or waterfall. In order to avoid this, these gaps should be filled.
 Tip #2.
When filling the gaps, a mortar or cement type mix can be used but this method is highly susceptible to cracking and movement. Another option is to use expandable foam, the foam will not crack or move and can fill large or small gaps in the rock placement. Typically foam is grey in color so that it will blend with most rock colors. Waterfall foam cans from Atlantic are available in two sizes – a 12 ounce can with a straw applicator or a 29 ounce can, which requires using a professional foam gun.
I highly recommend the professional foam gun if you build multiple water features during the season.
For the average one or two builds a year, the DIY 12 ounce can works great. To save on the use of foam you will only need to apply the foam in the locations that water is flowing over.
Please be sure to wear gloves and protective eyewear when handling the foam as it is very difficult to remove.
 Tip #3.
A great technique to disguise the foam that you used to fill in the gaps is by covering it with smaller stones and/or gravel. You can also add a small amount of sand over the foam before it is completely dry to disguise the foam to look more like a rock.
Make sure you give the foam time to cure before you turn your waterfall on. Once the waterfall has been turned on you can add more foam to push the water in the direction you prefer at any time.
Remember this is a foam product and is not glue or a patch product for leaks. It is only used to direct the flow of water.
Hopefully, these tips will help save you some time and frustration (as well as your back!) and keep your water flowing in the right direction! If you have any tips of your own, please feel free to comment below.
About the Author:
 JIM CHUBB
Jim has 26+ years of sales experience and 16+ years in the water garden industry.
My wife told me that she would like to have a waterfall in our backyard so that she can spend more time outdoors. I like how you suggest using special foam to create water flow. I will look for a residential demolition company so that they can help me remove the mawn and create a path for the waterfall.
Hi Derek! We’re so glad to hear that you’re considering a waterfall in your backyard! You can use our Find A Contractor feature on our website to help you start your project! https://www.atlanticwatergardens.com/find-an-installer
Let us know if we can help or give you anymore tips!
do you have any suggestion for stopping the water from rolling under the the rock spillway? We have a rather large drop down into our reservoir for our pond less setup and allot of water rolls underneath and ends up falling against the wall and thus missing the reservoir at the bottom. I’ve cut a groove underneath near the edge but it does not really help. my next step is to get a bigger pump and go from 2000gph to 4000gph for a stronger flow? any other ideas would be greatly appreciated.
Hi Bryan,
A larger pump should help. It would be hard to create a deep edge under a rock without being seen. If we could see a picture of what is going on, we would better be able to help. You could maybe add a bead of silicone so as the water runs back it hits the drip edge we created. If you have more questions, I’d be happy to help. Shoot me an email j.chubb@atlantic-oase.com.
Use caulk underneath it will stop the water from running off
If it’s not too late to increase the slope of your spillway+more gph pump as mentioned
Thanks for this informative article. I think those are the same steps and procedures that were used in my backyard by https://purelyponds.com/pondless-waterfall-installers/ which is one of the best waterfall contractors near me here in Arizona. I have no complaint on the finished products and looking back at it, they did every single thing on this article which makes me believe that they are the best!