
Create a water feature with ease with Atlantic’s Formal Spillway Project Bundles! You provide the hardscape materials and we’ve got the rest. Atlantic’s Project Bundles include all the Atlantic components you need, ready to be assembled into the water feature of your dreams. Build a beautiful Stainless Steel Spillway using your choice of stone.

What’s Included in the Stainless Steel Spillway Project Bundle?
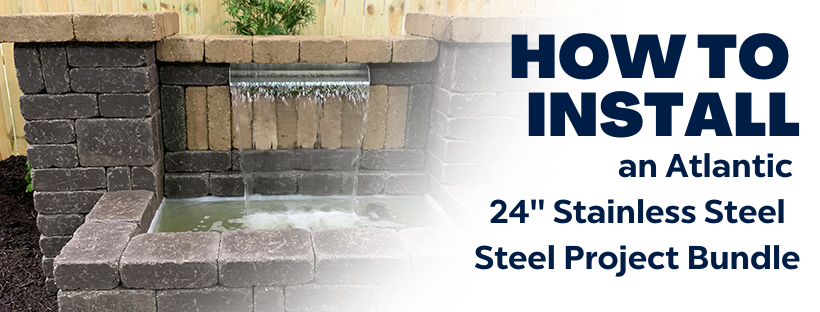
- 24″ 304 Stainless Steel Spillway or 24″ Copper Finish Spillway
- Flexible Hardscape Basin (in your choice of color, black, grey or tan) 4’W x 2’D x 16″H
- TT3000 pump
- Plumbing Kit
- Pump Discharge (1.5″ 90 – SPG X SOC, 2″ Fernco, 1.5″ tee, (2) 1.5″ Male Thread Adapters, SCH 80 Pipe Stub 1.5″ x 2.5″L)
- (2) 1.5″ Male Thread Adapter
- 1.5″ Tee
- Flex Tubing 1.5″ x 9′
- 1.5″ 90° (SOC x SOC)
- 1.5″ Fernco
- (2) Cord Seal Fittings
- Black RTV Silicone
- PVC Glue
Formal Spillway bundles are customizable to your project! Choose your Spillway color from either the Stainless Steel or Copper Finish Spillway. Then, choose the color of your Flexible Basin in either black, grey, or tan.
How to Install
The Stainless Steel Spillway Project Bundles, with two people, should take less than a day to install! We’ve created Quick Install Guides and how to install videos to help walk you through the process.
You can see our Quick Install Guides here: Stainless Steel Spillway Bundle Install Guide
In our install videos, we show you how to complete this water feature, step by step: preparing the base, building the structure, installing the plumbing and capping the columns. The only exception to our videos is that we dry stack the block, you’ll be gluing your blocks together with construction adhesive according to the manufacturer’s guidelines.
Watch our how to install video here!
Tools You’ll Need
For the Layout
- Markout paint
- Tape measure
- 2-ft level
- 4-ft level
- A straight 2×4
For the Excavation
- Wheelbarrow
- Shovel
- Tamper
Most stone manufacturers recommend setting their stones on a 4″ bed of tamped sand, stone dust or screenings. You’ll need about 8ft³.
For the Stone
- Lump hammer or mallet
- Grinder or chisel
For the Plumbing
- A large wrench (Channellock 16.5″ tongue and groove pliers)
- Screwdriver or nut driver
- Tubing cutters or PVC saw
For the Hardscape
You will also need your hardscape stone and the manufacturer’s recommended construction adhesive. Atlantic’s Flexible Basins are sized to accommodate the most common engineered stone dimensions. For this installation we chose 4 x 8 x 12 inch blocks, but there are many other options. Our feature took a total of 208 blocks, including 4 that needed to be cut.

Step-By-Step: Installing the Stainless Steel Spillway Bundle
Preparing the Base

Prepare the base according to manufacturer’s guidelines – most recommend a 4″ deep base of level, tamped sand or stone screenings. You’ll need at least a 5 x 6 ft area so there’s room to work. Level and tamp the base material until your footprints no longer leave an imprint. Then, go back and re-level the base.
Building the Reservoir

Lay out guidelines in the base material and start laying the blocks at the front and center. To make our feature more interesting, we set some blocks on edge, which required us building the first two courses simultaneously. We built the front and sides first, leaving the back wall to be measured and marked out before installing.
Measure between the side walls to make sure the walls are 48″ apart. Then, measure your front wall back to mark out a guideline for where your back wall will be placed at 24″. Use your marks as a guide and set the base blocks for the back wall, adjusting as needed. Measure and verify the space inside the walls is exactly 24″ x 48″, as that is how large the space needs to be to ensure the flexible basin will fit snuggly.

Finish the second course. Then, measure the diagonals. If the diagonals are equal, all of the corners are square. Check to make sure your second layer is aligned, level and plumb. Add the third and fourth courses of block next.

Cut a wall stone in half to make two 6″ pieces, set one in the corner of the third course and leave a 6″ wide space, centered 9″ from the corner for the plumbing to pass through the wall. Finish the fourth course by cutting a stone to 3″ and 9″ to allow a whole stone to span the space later.
Installing & Plumbing the Flex Basin
Ensure the base the flexible liner will be sitting on is clean, smooth and free of debris. The weight of the water could damage the liner if there are any sharp objects in the base material.

Remove the reverse-threaded nut on the bulkhead fitting, turning clockwise. Remove the rigid slip ring, leaving the soft rubber gasket in place. Then, insert the bulkhead fitting into the pre-punched cutout from the inside of the hole of the flexible basin. Slip the flange over the threads of the fitting, then, re-install the reverse-threaded nut, turning counter-clockwise. Tighten by hand adjusting the nut so the points of the nut are vertically up and down. Use a wrench to give the hexagonal nut a final turn.
When fully tightened, the top and bottom of the nut should be parallel to the top of the block. This will lock the nut in place. If the nut isn’t aligned like this, the bulkhead fitting will not sit properly between the blocks.

Install the preformed Flex Basin in the reservoir. Ensure the bulkhead fitting assembly fits in the space between the blocks of the third course. Cap the space with one whole block and the 3″ cut block to finish the fourth course and set blocks on the flaps of the flexible basin to temporarily hold it in place.

Apply the silicone to the threads of the small tee assembly and screw it into the bulkhead fitting. Temporarily align the side-outlet of the tee sideways for easier access to the Cord Seal Fitting, which allows you to pass a pump or light cord through the plumbing and back out again without leaking. To install the Cord Seal Fitting, disassemble and slip the rubber gasket around the pump cord, smooth sides towards rubber and the halves with the molded-in nuts towards the tee. Be sure to align the inner and outer halves at 90° to each other and then start the screws. Push the Cord Seal Fitting into the tee.
For the neatest installation, slide the rubber coupling on the pump discharge over the tee and snug up the pump cord, pulling any excess cord back through the bulkhead fitting. Then, tighten the screws on the Cord Seal Fitting alternating from one side to the other for even tightening, firmly but not excessively. The gasket will expand around the cord and into the tee, creating a leak-proof seal.
Re-orient the side-outlet of the tee and Cord Seal Fitting downwards and tighten the rubber coupling to complete the inner plumbing.

Begin filling the basin with water, working out the wrinkles on the floor and corners. As the water rises, pull up on the flaps to eliminate any wrinkles on the walls and, test the flaps for fit by folding them down flush onto the top of the walls. Stop filling the basin when the water reaches the bottom of the bulkhead fitting, or it will spill over.
To eliminate wrinkles, set each block to overhang a little more to the inside and pull the liner tight as you slide each block back until they overhang evenly. The liner flaps leave the edge of the block uncovered so, you can apply a continuous bead of adhesive to secure the caps. Apply a blob of adhesive into each cut out to secure the flaps.

Continue building the walls and columns. For our installation, we made a framed panel of contrasting block set vertically, edges front and staggered. At the top panel, in the fifth course, set the 24″ Stainless Steel Spillway in place of the two center blocks. Use silicone, not adhesive, to adhere the Spillway to the blocks to allow removal in the future if desired.
Build the columns up one more layer, to 11 courses, then cap the top of the back wall, the Spillway and the columns with contrasting colored stones.
Completing the Plumbing

Move to the back side of the wall to finish the remainder of the plumbing work. Slide a male thread adapter over the pump cord, apply silicone to the threads and install the adapter in the bulkhead fitting. Then, measure and cut a piece of pipe to extend from the male thread adapter to the back of the wall. Slide the section of cut pipe over the pump cord and glue into the male thread adapter. Next, slide a tee over the cord and glue that to the section of pipe, aligning the side-outlet of the tee towards the center of the back wall.
Dissemble and reassemble a Cord Seal Fitting around the pump cord into the end of the tee. Once the Cord Seal Fitting has been installed, the pump cord will have successfully passed through the wall of the reservoir, inside the plumbing, then out again, leak-free.


To finish installing the plumbing, apply silicone to a male thread adapter and install it into the Spillway. Measure and cut a short section to extend out from the male thread adapter to the back of the wall. Glue the short section of pipe into the male thread adapter and then glue an elbow, pointing downwards, to the end of the short section of pipe. Glue the remaining long section of pipe to the elbow, measure the length needed to reach the tee and cut the pipe to length. Lastly, glue the end of the pipe into the tee to complete the plumbing.
Plug the pump in and enjoy your beautiful new Atlantic water feature!
Be sure to check out our YouTube for videos on the other Formal Spillway Project Bundles and read more on the blog!
About the Author:

Caitlyn Winkle
After graduating from the University of Akron, Caitlyn joined Atlantic-OASE in the fall of 2019. Caitlyn manages the social media and online content for the company. She also supports the Atlantic-OASE Professional Contractor (APC) Program and Marketing Departments in creating marketing and advertising strategies and plans.